Thursday 13 October 2016

Paint It Black


Paint It Black nail art by @chalkboardnails

For today's prompt, "inspired by a song," I decided to do some nail art inspired by The Rolling Stones' "Paint It Black." The song is about depression and loss, and wanting to paint everything black to match those feelings.

If you're familiar with the song, the obvious choice would have been do a red door and then put some black on it, but I wanted to go for something a little more colorful and (only slightly) less literal. I opted for a bright base, splattered and smeared with black paint.

Paint It Black nail art by @chalkboardnails

I began with a white base to help the colors above it pop.

Then I cut off a strip of a makeup sponge, and painted swipes of my three base colors directly on to the sponge. I used China Glaze Too Yacht to Handle, Nicole by OPI Hit the Lights, and Girly Bits Hip Hoop Hooray.

For the big black swipe, I wiped most of the polish off of the brush of Salon Perfect Oil Slick, and then dry brushed it across my nails. I used a small nail art brush to add the splatters and drips, then finished with topcoat.
Paint It Black nail art by @chalkboardnails

Lavender Blossoms Floral Nail Art


Delicate lavender blossoms by @chalkboardnails

Delicate print is always a challenging day in the 31DC, because it's fairly vague yet still specific at the same time. I wasn't sure what I wanted to do this year, but I recently had some training on essential oil soaks at work and one of the blends included lavender. I thought that lavender blossoms would make a great "delicate" manicure, and I'm so so beyond pleased with how these nails came out.

Delicate lavender blossoms by @chalkboardnails

These nails were really easy -- I'd say the biggest key is making sure you have a super tiny nail art brush. If you don't, you can create one by thinning down the bristles of a thicker brush with cuticle nippers.

I started with a base of Polish My Life's Muscat Martini. It's an extremely pale purple, it's almost grey looking. Then, I painted on my stems with China Glaze - Take a Hike. Definitely place your stems first, as it allows you to keep an eye out for the overall balance of your art. I mixed Take a Hike with a bit of China Glaze - Trip of a Lime Time and added some lighter leaves.

Then, I used the tip of my nail art brush to dot on oblong blossoms. I did the bulk of the buds with LVX Aster, then went back in with LVX Currant and added some more (sparingly!) for additional dimension.

Delicate lavender blossoms by @chalkboardnails

Orchid Petals Inspired Nail Art


Orchid petal inspired nail art by @chalkboardnails

It’s “violet” day in the 31 Day Challenge! I decided to do nail art inspired by some gorgeous orchids that I spotted in our local grocery store. The pattern on the petals was so compelling that I just had to snap a pic of them to use for future nail art.


This was maybe the easiest nail art in the world, and I love how it turned out. I started with a cream colored base, and then used a large dotter to add the magenta patterning. I grabbed a smaller dotter and added purple to the pattern, inside of the larger dots. Then all that was left was to finish with topcoat!

Orchid petal inspired nail art by @chalkboardnails

Polishes used:

Orchid petal inspired nail art by @chalkboardnails

More 31 Day Challenge violet manicures:

Simple Vintage Floral Inspired by Lacquerstyle


Vintage floral nails by @chalkboardnails

We are nearing the end of the challenge! Today's prompt is "inspired by a tutorial" and I've taken inspiration from the talented (and Queen of Florals), Lacquerstyle. For this particular look, I've followed her Simple Abstract Floral Tutorial, which not only features a fun and easy design, but has gorgeous cinematography and photography to boot.

Vintage floral nails by @chalkboardnails

I wont detail how to do this look -- if you want to visit the tutorial, just click on the link above!

I used Formula X Cloud Nine as my base. The flowers are painted with China Glaze Make an Entrance, while the blue blossom sprays were done in China Glaze First Mate. I created the leaf shade by mixing China Glaze Take a Hike and American Apparel Crescent Heights.

I love this look, though mine aren't quite as perfect as Kristin's! The smaller blue sprays really add a lot to the completed manicure.

Vintage floral nails by @chalkboardnails

Check out the other tutorials I've tried in the past:

Garnet Glittering Gradient Grid Gels


Garnet Glittering Gradient Grid Gels by @chalkboardnails

It's the first day of the 31 Day Challenge! If you're totally confused about what's going on, be sure to check out my 31DC FAQ page, which will answer all of your questions.

The first prompt of the challenge is "red," and -- what luck -- I was already wearing red rockstar glitter gel nails!

So the big goal for this manicure was to try to improve on my gel gradients, which were not as strong as I want them to be. I picked black to use as my gradient color, and sponged it on with clear gel to create the fade.

Truthfully, the method I used for this gel gradient is the same as if I were using regular polish, but with a few small modifications. Here's the gist:
  • Cut your makeup wedge sponge into a thin strip to help minimize mess.
  • Paint stripes of the colors you want to use on the sponge.
  • Tap it LIGHTLY on to the nail. Don't overtap, as this can pull the gel back up off the nail. If you're used to sponging gradients with regular polish, you'll definitely have to modify your pressure to make it lighter.
  • Clean up any mess on your fingers before you cure in your gel lamp.
  • Cure between each round of sponging.
  • I did four or five rounds of sponging, cleaning, and curing for this manicure.
After the gradient was looking good, I painted on a black grid that faded away into the darkest parts of the nails.

Garnet Glittering Gradient Grid Gels by @chalkboardnails

Products used:
CND Shellac Base Coat and Xpress5 Top Coat
Recollections glitter in Cherry
DIY Hard Nails - Black Cat (black gel)
Akzentz Gel Play in black (grid pattern)

My previous red 31DC manicures:
Crab print and nautical mix

The Contrary Polish Wintry Weather Collection


Contrary Polish Wintry Weather Collection via @chalkboardnails

These swatches are long overdue, but as we're headed back into winter anyway, I figured now would be a great time to share this seasonally-themed collection with you! The polishes are still available for purchase, so thankfully my tardiness has not affected their availability.

Meet the Contrary Polish Wintry Weather collection, a group of three chilly shades with shimmer and icy flakes!

Frozen Sky is a grey shade with silver shimmer and flakes. I used three coats for the coverage below.

Contrary Polish Frozen Sky via @chalkboardnails


Snowy Night is a rich, deep navy with white shimmer and flakes. I used two coats for my swatch.

Contrary Polish Snowy Night via @chalkboardnails


Winter Sun is a squishy, marshmallow-white with gold shimmer and flakes. I used three coats for the coverage shown, and found this one to be a little streaky when applying, so be sure to wait between coats for your previous coat to set.

Contrary Polish Winter Sun via @chalkboardnails

If you're feelin' these shades, head on over to Contrary Polish where they are available as minis for $5 and as full size bottles for $10. Which one is your favorite?

Mid Century Modern Nail Art


Mid century modern nail art by @chalkboardnails

Hello friends! It's been a while since I posted here (thanks to everyone that reached out to make sure I was ok), but I'm back with a couple of snazzy new things to show you! First off, don't miss my new blog header! I wanted something fresh, lighter, and more fun, and so I made it mahself. Second, I'm shooting my photos on a light background! The black background looked too heavy with the blog refresh, so I'm giving this a go.

Now, on to the nail art. This simple look was created by saying "yes, and..." You know that rule of improv where you're supposed to take what your partner says and say "yes, and..."? It accepts what's already put into play and then adds more to the scene. Well in this manicure, I just kept adding pieces! It looked nice at several stages throughout the process, but I decided not to stop and to keep adding elements.

Mid century modern nail art by @chalkboardnails

I used the following polishes for this look:
LVX Militaire (base)
LVX Monarch (gold)
Salon Perfect Oil Slick (black)
Formula X Push the Limits (red-orange)

Can we take a second to marvel at the beauty that is LVX Militaire, by the way? It's such a great gorgeous grey with just a twinge of green, and it covered perfectly in two coats.

After applying the base, I used the polish brush of Monarch to dab some random gold shapes on top of it. Next, I grabbed my new Tati Chou Chou detail brush (splurge!) to add the thin black linework. The last step before topcoat was to apply the red and black dots; use a dotting tool for the smaller ones and a pencil eraser for the large ones.

Mid century modern nail art by @chalkboardnails

I hope you enjoyed this look, and here's crossing my fingers that the next post won't be another month out! :)

Simple Constellation Nail Art


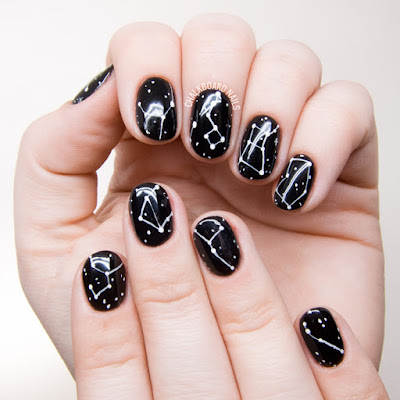
Constellation Nail Art by @chalkboardnails

I was due for a fresh set of gel polish this week, and have been craving black and white lately. I don't usually gravitate towards dark nail colors, because I feel like they make my nails look small and (sometimes) weird. #truenailconfessions. BUT, I've been seeing black and white nails all over my feed lately, and it had me wanting it on my own fingers.

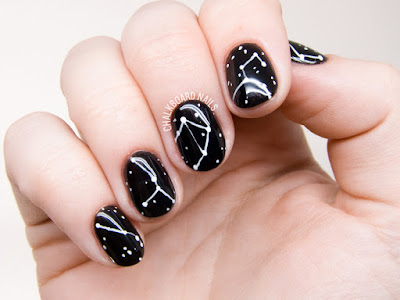
Constellation Nail Art by @chalkboardnails

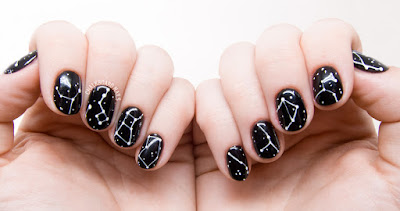
Since I try to ride out these gel polish sets as long as possible, I can't slack on the nail art for my right hand. I figured constellations would be easy enough that I could pull off something passable using my left hand.

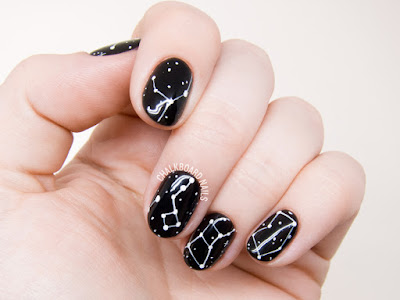
I started with two coats of my new favorite black gel polish, Presto #060 Minaccioso. Next, I used Wildflower's Art Paints in Powder to paint on constellations and stars. Then, I used two coats of gel topcoat to seal the paint details in. Easy peasy!

Constellation Nail Art by @chalkboardnails

P.S. They're all based on real constellations! I wanted to do my zodiac sign, but who knew Sagittarius had so many stars in it?!?!?

Sushi is Bae Nail Art


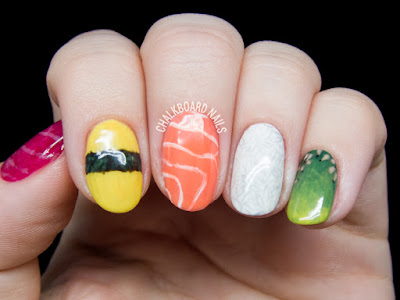
Sushi nail art by @chalkboardnails

I love sushi and so does most of the rest of the world. It's fresh and delicious and actually gorgeous. Have you SEEN the color of raw tuna? I want to paint my LIFE in it!

Anyway, as with most things I love, I decided to try to put it on my nails. Because, naturally. I've seen a lot of gorgeous interpretations of sushi nails lately, but I did try to make mine "my own."

Sushi nail art by @chalkboardnails

On my thumb, I put my bae tuna. My pointer is tamagoyaki, which honestly I chose more for it's color than anything -- I have only eaten it once! My middle finger is salmon, my ring finger is rice, and my pinkie is intended to look like avocado with sesame seeds.

Quick sidebar about the rice nail that might give you some insight into my brain: in hindsight, if I were to do this all over again, I would paint individual white grains of rice over a negative space clear nail. I think that would read more like rice and look cooler than what I attempted here. The grey patterning is hard to read.

Sushi nail art by @chalkboardnails

I used gel polish for this, but won't be able to list out all of the materials I used. I did a lot of color mixing, layering, and blending, and beyond that, I wore this manicure a month or two ago and I don't remember the specifics. Oops! 😇

Are you a sushi fan? What's your favorite thing to order?

Paint All The Nails Presents Watercolour | Nail Vinyl & Sharpie Nail Art


Hello lovelies,
Another month has passed (incredibly fast I must say) and it's time for another Paint All The Nails nail art challenge. This month we voted for watercolour theme so I'm sure there will be A LOT of beautiful manicures :) If you'd like to see them all, check out the link-up below or check #paintallthenailswatercolor on social media.
I haven't prepared a watercolour mani this month because it completely slipped my mind but I've had one older one that I could use, hence the square nails ;) So let's have a look at what I did this time...
Paint All The Nails Presents Watercolour | Nail Vinyl & Sharpie Nail Art


I've reached for beautiful Morrocan-style pattern nail vinyls from Whats Up Nails* because I wanted to try the Sharpie and nail vinyls art after watching Simply Nailogical's tutorial.

I must admit that the manicure didn't go to plan and the Sharpie watercolour leaked underneath the stencil in few places (I didn't press it down enough). So I just did some nails with the stencil and some just plain. To do that I draw few lines with chosen colour of Sharpie on a piece of foil and then loaded a brush with a bit of alcohol and wiped the Sharpie off the foil. Then I put it randomly on the nail, added different colours and kept going in with alcohol and colours until I created a nice effect.

The base colour is Color Club French Tip, an opaque white creme nail polish (15% discount code STASH15 - not affiliate, just saving you £££s).

Paint All The Nails Presents Watercolour | Nail Vinyl & Sharpie Nail Art
 

I was gutted when I peeled off the stencil and the inked leaked underneath but funny enough, I now like the final result and I hope you do too!

Have a lovely day

Hand-Placed Glitter Flowers


Glitter floral nails @chalkboardnails

Here's a bit of a throwback look for ya! I did these nails probably about a year ago, and while I posted about them on social media, they never made it to the blog here. Plus, with fall arriving, these neutral tones with a slight twinge of grey are right on schedule.

Glitter floral nails @chalkboardnails

This look is done with Shellac. It is much easier to do this style with gel, though you could accomplish it with regular polish, too.
  1. After prepping your nails properly, apply your base gel and cure.
  2. Apply one coat of CND Shellac in Field Fox, and cure. Repeat with a second coat.
  3. Use a dotting tool or Crystal Katana to individually place pieces of round glitter to form flowers and falling petals.
    • Since the cured layer of Shellac is so sticky, I was able to pop them right on a cured nail and have them stay. If your gel isn't as tacky, you can also place the glitters into a layer of uncured gel and then cure them together.
  4. Topcoat generously and cure. Add a second layer if necessary.
Glitter floral nails @chalkboardnails

I purchased my round glitters from Presto via Nail Labo. Wildflower's Nails also has a huge selection of glitters that would be fun to build flowers or other shapes from!

No round glitters? No problem! You can use a dotting tool with a large and small side to accomplish this same look. Just go slowly and work carefully -- part of what makes this style so appealing is that the dots are all the same size.

What do you like to wear on your nails when fall comes around? Do you change your polish shades for the season, or keep on rocking brights and pastels?